
![]()
|
Einbauanleitung:
|
Installation guide:
|
Bilder:
|
Pictures:
|
|
SmartCooler© Montageanleitung zum Einbau von CPU-Kühler für Sockel 7 / 370 / A
|
SmartCooler© description to mount a CPU-Cooler on a Socket 7 / 370 / A
|
|
|
|
Schritt 1:
|
Step 1:
|
|
|
|
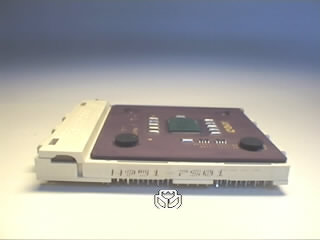
SmartCooler© auspacken und auf Funktion überprüfen. Schließen Sie
den Kühler vor der Montage testweise am Motherboard oder Netzteil an.
Überprüfen Sie, ob Wärmeleitpaste oder eine Folie auf der Bodenplatte
aufgebracht ist, oder ob dem Kühler eine Paste oder Folie beigepackt ist.
Nachdem alles in Ordnung ist, können Sie mit dem Einbau beginnen.
|
Unpack your SmartCooler© and improve function. Connect to your Powersupply
or to your motherboard. Improve if there is any Heatpad or greese put on the
base or if there is any grease or Heatpat inclouded.
After everything is ok, you can start with mounting.
|
|
|
|
Schritt 2:
|
Step 2:
|
|
|
|
Hier sehen Sie die vom Werk aus aufgebrachte Wärmeleitpaste.
|
Her you can see the grease mounted by factory.
|

|
|
|
Schritt 3:
|
Step 3:
|
|
|
|
Ist keine Paste oder Wärmeleitfolie aufgetragen,
so verwenden Sie die beiliegende Paste oder Folie.
Daneben können Sie auch die besser leitenden Pasten
bestehend aus Kupferoxyd oder Silberoxyd verwenden.
|
If there is no mounted Pad or grease, you can put
on the grease or pad within the packing. You also
can use better grease like Copper- or silvergrease.
|

|
|
|
Schritt 4:
|
Step 4:
|
|
|
|
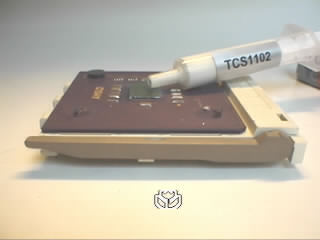
Falls keine Paste auf der Bodenplatte aufgetragen ist,
so tragen Sie lediglich einen kleinen Tropfen Paste
auf die Mitte des CPU-Kerns auf.
|
If there is no mounted Pad or grease, just ink a small drop
in the center of the DIE.
|
|
|
|
Schritt 5:
|
Step 5:
|
|
|
|
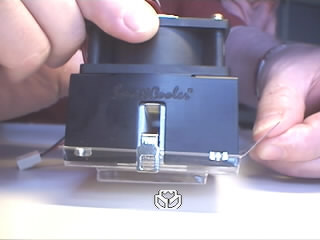
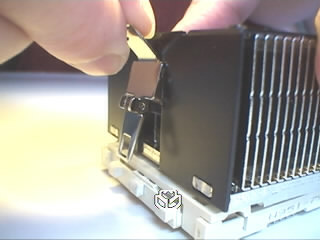
Wichtig: Setzen Sie den SmartCooler© nun ganz gerade auf den Prozessor.
Bitte nicht verkanten, sonst kann die CPU beschädigt werden.
Die Aussparung der Bodenplatte muß über der Erhöhung des Sockels platziert werden.
Anschließend hängen Sie den hier sichtbaren Teil der Klammer in die Sockelnase ein. |
Important: Put your SmartCooler© on the socket only exactly horizontal.
If you do not install this way, CPU DIE might be damaged.
Now install the part of the clip you can see here. |
|
|
|
Schritt 6:
|
Step 6:
|
|
|
|
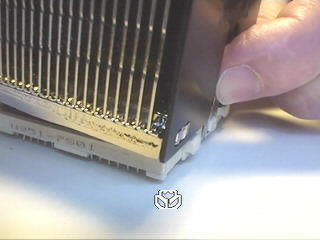
Wichtig: Der SmartCooler© muß dicht an diesem Teil der Klammer sitzen,
damit er vorne nicht auf dem erhöhten Teil des Sockels aufsitzt.
|
Important: This rear part of the SmartCooler© must be mounted close to the clip
to avoid wrong installation at the front part of the Socket.
|
|
|
|
Schritt 7:
|
Step 7:
|
|
|
|
Wichtig: Der SmartCooler© muß dicht an diesem Teil der Klammer sitzen,
damit er vorn nicht auf dem erhöhten Teil des Sockels aufsitzt.
|
Important: This rear part of the SmartCooler© must be mounted close to the clip
to avoid wrong installation at the front part of the Socket.
|
|
|
|
Schritt 8:
|
Step 8:
|
|
|
|
Der SmartCooler© sollte jetzt richtig montiert sein.
Schließen Sie nun den dreipoligen Stecker des SmartCooler©
direkt an das Motherboard an. In der Regel ist
dieser beschriftet mit CPU oder CPU-FAN.
|
Your SmartCooler© should be installed properly.
At last connect SmartCooler© with your motherboard.
Normally this connector is called CPU or CPU-FAN.
|
|
|
|
Bitte folgendes unbedingt beachten:
|
Please look at the following Instructions:
|
||
|
Wichtig: Achten Sie darauf, daß Ihr Board genügend
Leistung (mA=Milliampére) für den SmartCooler© zur
Verfügung stellt. Lesen Sie hierzu die Beschreibung des Motherboards.
Haben Sie einen SmartCooler mit SmartSpeed© erworben,
so muß die eventuell vorhandene Lüfterregelung Ihres
Motherboards abgeschaltet werden.
|
Important: Take care your board Fanconnector output
has enough power (mAmp). Read Instructions of Board
supplier. If you have a SmartCooler© with SmartSpeed©
you must disable your existing Fan control feature
from your Motherboard.
|
||
|
Achtung 1:
|
Attention 1:
|
|
|
|
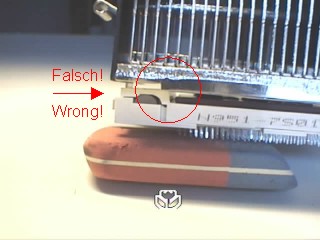
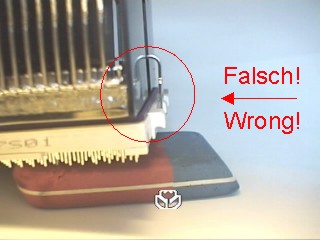
Wichtig: Wird Ihr SmartCooler© am vorderen Teil des Sockels
wie hier abgebildet montiert,
so steigt die Temperatur sehr schnell (innerhalb von 60 sec.)
bis auf 80 °C und höher und führt anschließend unweigerlich zum
Hitzetod !! Aber auch wenn die Bodenplatte den Sockel
nur berührt wird, kann das einige Grade ausmachen.
|
Important: If your SmartCooler© is mounted like shown on
the right picture, CPU will go up to 80 °C and more and
will damage Cpu. Even if base has contact to the socket only,
the temperature will grow some degrees higher.
|
|
|
|
Achtung 2:
|
Attention 2:
|
|
|
|
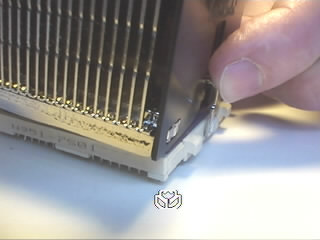
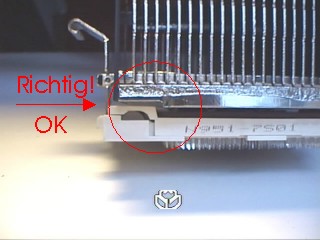
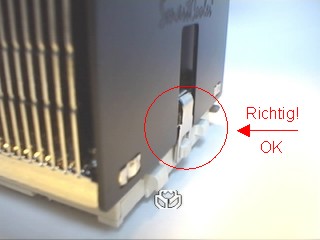
Wichtig: Bei der falschen Montage ragt der hintere
Teil der Klammer, wie rechts abgebildet, sichtbar heraus.
|
Important: If installed wrong, the rear part of the clip
looks like shown on the right picture.
|
|
|
|
Achtung 3:
|
Attention 3:
|
|
|
|
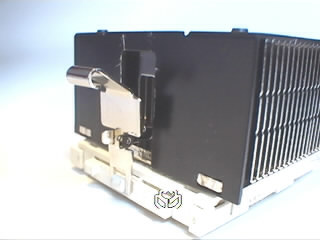
Wichtig: Diese Abbildung zeigt einen korrekt montierten SmartCooler©.
|
Important: This picture shows a propperly installed SmartCooler©.
|
|
|
|
Achtung 4:
|
Attention 4:
|
|
|
|
Diese Abbildung zeigt einen korrekt montierten SmartCooler©.
|
This picture shows a propperly installed SmartCooler©.
|
|
|
| SmartCooler GmbH übernimmt keine Haftung für die oben aufgeführten Angaben. Alle Informationen sind ohne Gewähr. Änderungen bleiben vorbehalten. | SmartCooler GmbH accept no liability for accuracy of the above given information. Technical changes are subject to alteration. | ||
![]()